Pixelman - FAQ
Q:
I want to convert Pixelman output files from binary to ascii format.
A:
You can use one of two methods. The first one is better if you need straight
conversion of any file format to another one (including picture) while keeping
the .dsc file, the second allows to apply also some filters to the data but it
has some limitations (it supports only single chip assemblies and it doesn't
support Binary [X,Y,C] format). Also for now, it ignores original .dsc file and
saves .dsc data from the Dummy device itself.
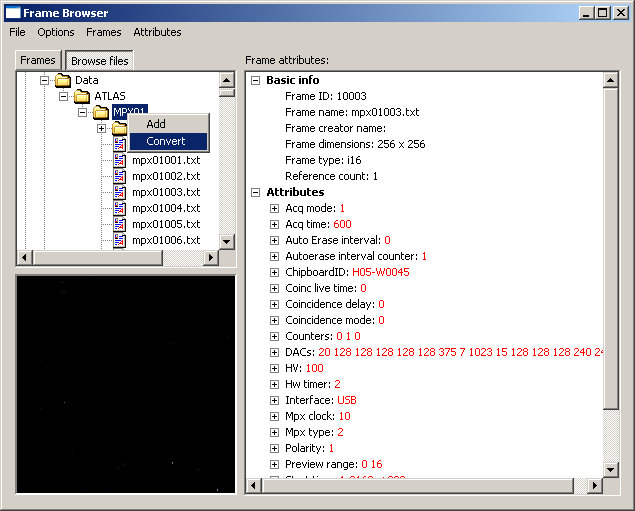
1. Using "Frame browser"
- Right click on the Pixelman icon in the tray and select "Utilities" -> "Frame browser"
- In frame browser select tab "Browse files"
- Browse to the directory with data to be converted and select files
(or the directory itself - this is usually the fastest way) e.g directory
"My data". Right click on the selected items ("My data") and choose either
"Add" => Pixelman will read all the data in the memory and they will appear
in the first tab "Frames" or "Convert" => Pixelman will convert the
data directly from the drive (cannot be used for saving image).
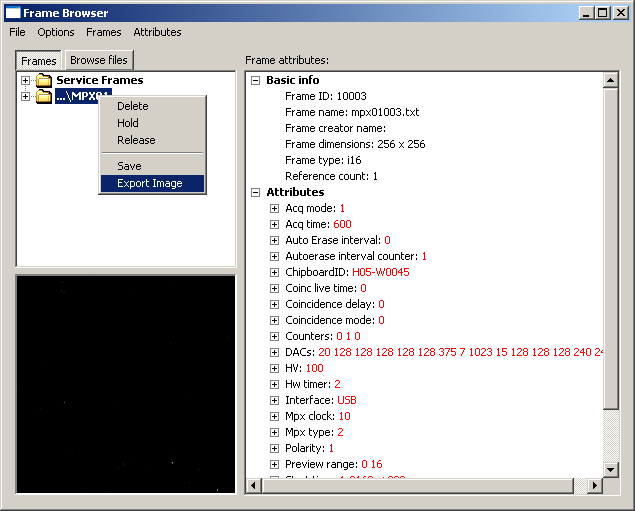
- If you have used the option "Add", now choose tab "Frames" and select
frames to be converted ("...\My data"), right click on it and select
save or export. In file save dialog window choose the file format you
like. If you want to save your data as an images it might be usefull
to set the range of the output properly. You can choose several option
by right-clicking on the preview window (below the frame tree).
2. Using Dummy driver
- To activate Dummy hardware, you have to edit file "mpxhwdummy.ini" and
put there number od Dummy devices you want to use e.g. "Count=1". You can
find the .ini file in the subdirectory "hwlibs" of your Pixelman.
- Open dummy hardware by rightclick on the Pixelman icon in the tray and select e.g. "0 - dummy 2000" and "Medipix control"
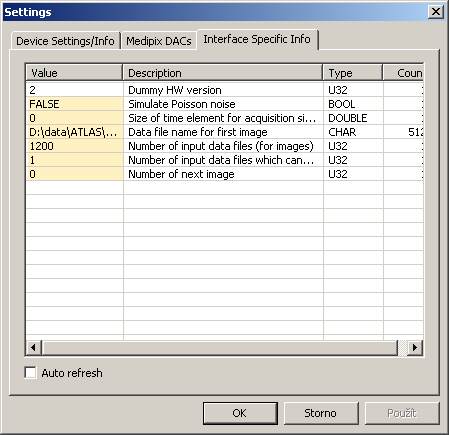
- In menu of "Medipix control" window go to "Options" -> "Device settings".
- In settings window select tab "Interface Specific Info" and enter
path to the first data file to be processed into item "Data file name
for first image" (you can change values of items with orange background
by "slow double click" - it is similar to renaming of files in file
explorer or you can use "space" key). You can put there a path to
whole directory as well. Than the Dummy driver automatically pick up
all the relevant data files (this is usefull e.g. for the data taken
with the "Repeat" function).
- In the "Medipix control" window perform dummy measurement (it is dummy
device => it will use the stored data pointed by path you have entered).
So if you have e.g. 48 files run 48 acquisitions. You can use filter chains
to perform some additional processing of your files. You can instruct
Pixelman to store obtained data in any format you like but note that the
.dsc file will contain settings of the dummy device and not your original measurement.


